Friday 17 June 2011

Final Personal Evaluation

Working in composition is something I've always been interested in, and working thro this tracking process has only strengthened my interest 
Despite the problems I encountered with tracking. It was reassuring to research match moving, and knowing that if I indeed did follow a composite career, I could expect footage to be filmed with correct track points filmed on set.
However it was interesting and challenging to try and fix the track myself, but further research & time is required!

I think I achieved the goals i set out in my proposal and am happy with my final renders.
In future id like to apply this knowledge to a production and longer footage, although arguably Id like the footage match moved on set before hand, whether that be by me or as part of the production I'm happy either way.
Finally I think I'll put more research into match moving so i can understand the process further.

Final Render's

After I had cropped the footage to remove the need for two trackers, I could render out the complete project, I used both my edited ship wreaks and the greek temple in the end.


Despite struggling with the tracking points, i was happy with the final movies (just screenshots here, sadly they seemed to large to convert for uploading - see project dvd) I managed to remove the wiggle on the mattes, and now they line up and track great - I hesitantly say 'perfectly'.
 

Encountered Problems

One of the immediate problems I had to deal with, was correcting the tracking data.  It was actually quite easy for me to research and write about match moving and not really grasp its utter importance.  I thought I could easily work with a piece of footage without track points setup during the actual shoot.  Of course, After Effects can attempt to track anything within reason, I thought this would be enough.


Even though I tried my best to pick areas of high contrast to use for tracking.  In this image, you can see the individual tracking data (the aqua squares), each one represents one keyframe.  Its immediatly obvious from the picture that the tracking data here is bad, jumping all over the place, leading to very jittery parenting.
This made my matte jitter about really badly, I had to re track many times to try and improve the results. Sadly it was hard to make progress.

Eventually I decided to remove the 1st few seconds of footage, so I could move onto just a single track.  Whats more, the later half of the footage contained much easier and appropriate track points, rather than the difficult sandy coloured ground.  Whats more, adjusting the track manually is something I was not familiure with, I assumed the points had to be re arranged into a smooth line, however this was a daunting task.

My Motion Tracking

Firstly I created 2 null objects, these are used to apply tracking data to, and appear invisable in the render, a great helper tool.
At first I worked with the full footage, this required two seperate tracks, as the camera pans up the tracker will disappear off the frame, which if course is undesirable.

As the camera is shakey, hand held, the rotation must also be tracked, you can see my tracking controls at the bottom right of the After Effects window.  Now I had to choose the track points, high contrast parts of the image.


Here is the result of the first track, applied to the null object.  You can see the key frames in the timeline window, and in the comp video window.  
Next the tracking was repeated for the second part of the video, begining from the point the first track disappears from the viewable frame.


Heres the two nulls with tracking data applied, you can see in the timeline that the 2nd null tracking data starts on the keyframe where the 1st tracking data ends, now in order to create a seemless track between the 2 pieces of data, I parented the 1st null to the 2nd.

Finally i move the timeline to 6.16 seconds, the same frame I used when taking the still image from the footage to create the matte.  Now I know its lined up correctly, I can parent the image to the 1st null to create the set extension effect, ho ho!

Gathering Assets

I set about gathering the needed production assets to create the shot.

I gathered the footage from a free video copilot asset, sadly I didnt have time to film things myself.  The footage is under 10seconds and perfect for a set extension (as was intended).

The next stage was of course to create the matte, since the video has a desert background it made me think of a beach, and then ship wreaks.
I searched google for some free shipwreak images, ones that were beached, then i could easily cut them out and edit in photoshop to create a basic matte.


Later I thought about other variations, and after working with underwater ruin research for my 3D World project, i quickly took a look at some ancient greek images.


The temple fit the scene really well.

This ends the assests I needed to complete the shot, now the composition can begin.

Wednesday 15 June 2011

After Effects Motion Tracking

After Effects incorporates a motion tracker as part of its standard tools.

However before tracking can begin, there are several elements that need to be explained.  In professional film production, tracking begins even before the cameras are rolling.  Match movers will place markers around the studio set (or on location set etc) however for a large cgi shot it likely will be filmed in a studio.  This is important practice, as exact measurements are needed to compute the cameras location and get a correct match.   These marked points on set can be selected later inside the computer program for motion tracking.


This picture from a movie set is a great example, you can see the blue screen marked with clear white dots at intervals.

However it is also possible to camera track without pre-marking the scene, of course a smaller production or perhaps personal work might use video not privy to the luxury's of a 100 million dollar film set.  After Effects (and indeed most tracking software) can still track by having the user select key points that remain in frame for the duration of the track.  Usually areas of high-contrast are best, as the tracker has an easier time picking them up,  of course this is not as perfect as matched moved film, as such some tracking might be needing a manual user tweek.


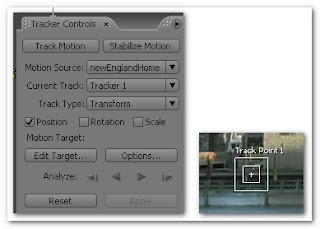
These are the After Effects tracker controls and track point.  You can add multiple track points and edit targets that the tracking data will be applied to.  Important to note here are the Position and Rotation settings, each referring to how the camera behaves in the footage.  Position might only be required if the camera is locked off on a straight pan, but rotation is needed if the camera is shaky or hand held.  If the tracker does not get these specific settings then the end result will not match the footage correctly.

This is the track point, placed on the footage (on your match move point if you have one) but if not, its up to the user to find a good area of high-contrast for a track.  The first square is the feature region, it defines the element in the layer to be tracked. While defining feature region make sure that feature region should surround a distinct visual element in the shot.
The search region square defines how far the tracker will look for the feature region, larger might increase tracking processing times, but higher safety threshold.
Heres an example of the tracker applied to a good area of footage, the buoy, red over the constant ocean colour, gives the tracker a great spot to track from.

Heres a picture of a finished track, each frame is visible, this track is just a position track with a locked off straight pan camera, you can see it clearly moving across the screen, quite simple but it works.

Finally the tracking data can be applied to a null object, this is an invisible object but can used to contain important data.  The reason the data is applied to a null, is because then composition elements can be parented to the null to match the scene perfectly.  For example, in a set extension, the matte image, would be parented to the null object, making it copy the position and rotation data from the track, allowing the image to move in time and place with the camera, lining up perfectly and giving the desired visual effect.

Tuesday 14 June 2011

Proposal

Compositing is a key process in the visual effects industry, responsible for creating and finalizing cgi and real motion video, often with the use of a green screen.

This area of visual effects really interests me and I would like to develop my skills further in hopes of a future career.  Many composition effects require a lot of pre assets, 3d models, shot footage etc.  Although I could spend time producing these assets, I want to focus on the composition process fully,  this is also how a production studio pipeline would work, the compositor is provided with the assets to work with and then pass on thro the pipeline.  

Set extension (matteing) is a common composition task, I decided to focus on this visual effect.
Although I do not have access to a studio and green screen set, I could still apply this effect to excisting footage or even 3d work I'd completed in the past.  With this chosen it would provide a great opportunity for research and to further develop skills.  The research could cover both After Effects and 3d max, as max can produce video files in different channels and camera matching, perfect for composition.
Matching footage is also an important part of the visual effect, with this project I can practice and research camera matching live footage or inside 3d max with its built in tools.

Matching is such an important part of visual compositing, I will spend extra research and time developing further knowledge and skills in this area.  Without correct point mapping and matching for live footage, it is almost impossible to composite correctly.

Here is my plan of action.
  • Research set extension and matte digital painting effects and techniques.
  • Research camera matching and camera tracking in 3d Max and After Effects.
  • Gather or produce assets to compile the finished effect.
  • Produce a video including the set extension visual effect, either live footage or using a 3d max render.

I hope all these research aspects and task can provide me with a good learning experiance and future insight into compositon workflow for a production company.